一、基本操作

对数据库以及表的一些基本操作


1-1.关于数据库

 1
 2
 3
 4
 5
 6
 7
 8
 9
10
11
12
//创建数据库
create database h_test;        
//查看数据库
show databases;  
//查看数据库信息    
show create database h_test;
//修改数据库的编码,可使用上一条语句查看是否修改成功
alter database h_test default character set gbk collate gbk_bin;      
//删除数据库
drop database h_test;
//综上,可以直接创建数据库且设置编码方式
CREATE DATABASE h_test DEFAULT CHARACTER SET utf8 COLLATE utf8_general_ci;

1-2.关于数据表

 1
 2
 3
 4
 5
 6
 7
 8
 9
10
11
12
13
14
15
16
17
18
19
20
21
22
23
24
25
26
27
28
29
//首先选定操作的数据库
use h_test;
//创建表student
create table student(
  id  int(11),
  name  varchar(20),
  age int(11)
);
//查看数据表
show tables;
//查看数据表信息,后面加上参数/G可使结果更加美观
show create table student;
//查看表的的字段信息
desc student;
//修改表名
alter table student rename [to] h_student;
//修改字段名
alter table h_student change name stu_name varchar(20);
//修改字段的数据类型
alter table h_student modify id int(20);
//添加字段
alter table h_student add grade float;
//删除字段
alter table h_student drop grade;
//修改字段的位置
alter table h_student modify stu_name varchar(20) first;
alter table h_student modify id int(11) after age;
//删除数据表
drop table h_student;

1-3表的约束

约束条件 说明
PRIMARY KEY 主键约束,用于唯一标识对应的记录
FOREIGN KEY 外键约束
NOT NULL 非空约束
UNIQUE 唯一性约束
DEFAULT 默认值约束,用于设置字段的默认值

1-4索引

作用:提高表中数据的查询速度 1.普通索引 2.唯一性索引 3.全文索引 4.单列索引 5.多列索引 6.空间索引

 1
 2
 3
 4
 5
 6
 7
 8
 9
10
11
12
13
14
15
16
17
18
19
20
21
22
23
24
25
26
27
28
29
30
31
32
33
34
35
36
37
38
39
40
41
42
43
44
45
46
47
48
49
50
51
52
53
54
55
56
57
58
59
60
61
62
63
64
65
66
67
68
69
70
71
72
73
74
//创建索引
//.创建表的时候创建索引
create table 表名(
        字段名 数据类型[完整性约束条件],
        ...
        字段名 数据类型,
        [UNIQUE|FULLTEXT|SPATIAL] INDEX|KEY
  );
//1-1.创建普通索引
create table test1(
  id  INT,
  name VARCHAR(20),
  age INT,
  INDEX (id)
);
//可以插入一条数据,查看索引是否被使用
explain select * from test1 where id=1 \G;
//1-2.创建唯一性索引
create table test2(
  id  INT,
  name VARCHAR(20),
  age INT,
  UNIQUE INDEX unique_id(id asc)
);
//1-3.创建全文索引
create table test3(
  id  INT,
  name VARCHAR(20),
  age INT,
  FULLTEXT INDEX fulltext_name(name)
)ENGINE=MyISAM;
//1-4.创建单列索引
create table test4(
  id  INT,
  name VARCHAR(20),
  age INT,
  INDEX single_name(name(20))
);
//1-5.创建多列索引
create table test5(
  id  INT,
  name VARCHAR(20),
  age INT,
  INDEX multi(id,name(20))
);
//1-6.创建空间索引
create table test6(
  id  INT,
  space GEOMETRY NOT NULL,
  SPATIAL INDEX sp(space)
)ENGINE=MyISAM;
---------------------------------------------------
//二.使用create index语句在已经存在的表上创建索引
//首先新建一个表,这个表没有索引
create table student(
  id int,
  age int,
  name varchar(20),
  intro varchar(40),
  g GEOMETRY NOT NULL
)ENGINE=MyISAM;
//2-1.创建普通索引
create index index_id on student(id);
//2-2.创建唯一性索引
create unique index uniqueidx on student(id);
//2-3.创建单列索引
create index singleidx on student(age);
//2-4.创建多列索引
create index mulitidx on student(name(20),intro(40));
//2-5.创建全文索引
create fulltext index fulltextidx on student(name);
//2-6.创建空间索引
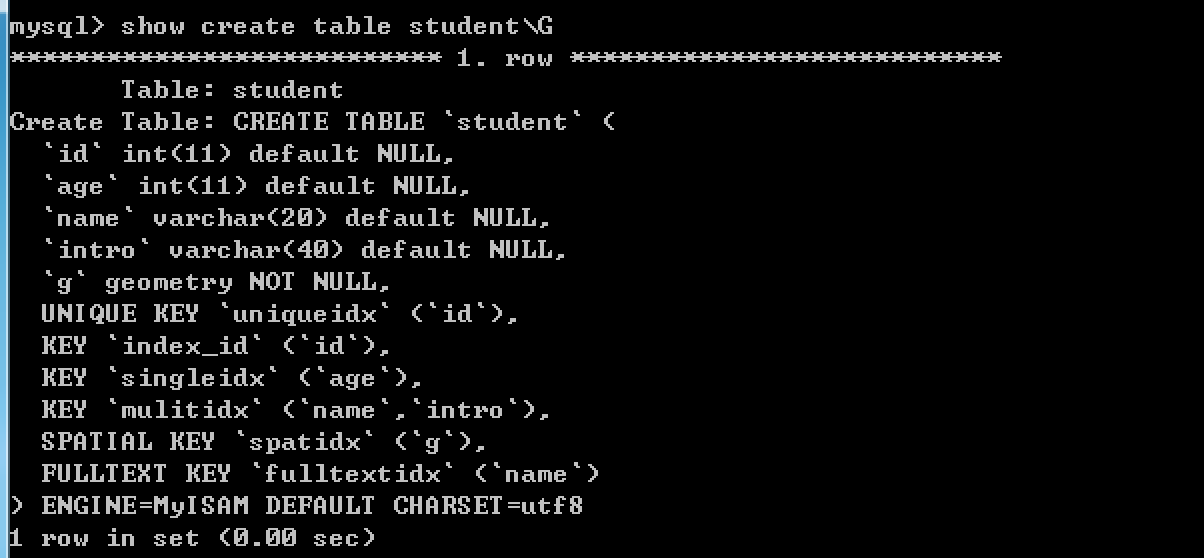
create spatial index spatidx on student(g); 
//下图是第二种方法创建索引演示后的所有索引

img

 1
 2
 3
 4
 5
 6
 7
 8
 9
10
11
12
13
14
15
16
17
18
19
20
21
22
23
//.使用alter table语句在已经存在的表上创建索引
//删除student表,重新创建
drop table student;
create table student(
  id int,
  age int,
  name varchar(20),
  intro varchar(40),
  space GEOMETRY NOT NULL
)ENGINE=MyISAM;
//3-1.创建普通索引
alter table student add index index_id(id);
//3-2.创建唯一性索引
alter table student add unique uniqueidx(id);
//3-3.创建单列索引
alter table student add index singleidx (age);
//3-4.创建多列索引
alter table student add index multidx(name(20),intro(40));
//3-5.创建全文索引
alter table student add fulltext index fulltextidx(name);
//3-6.创建空间索引
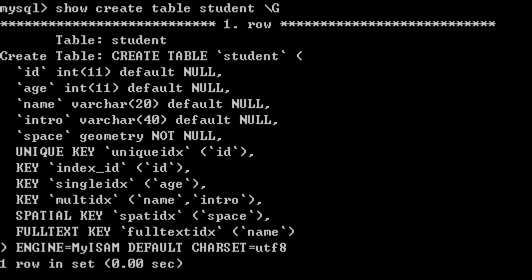
alter table student add spatial index spatidx(space);
//下图演示结果

img

1
2
3
4
5
6
//删除索引,有下面两种方式
//1.使用alter table删除索引fulltextidx
alter table student drop index fulltextidx;
//2.使用drop index删除索引spatidx
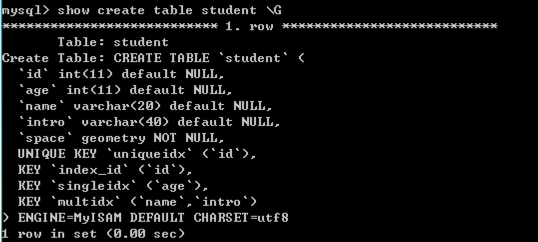
drop index spatidx on student;
//下图可看到删除成功

img

1-5.添加数据

 1
 2
 3
 4
 5
 6
 7
 8
 9
10
11
12
13
14
15
16
17
18
//重新建立表student
drop table student;
create table student(
  id int,
  name varchar(20) not null,
  grade float
);
//插入一条数据,也可以少某个字段的同时也少对应的数据
insert into student(id,name,grade) values(1,'howie',70);
//也可以不指定字段名,但要注意顺序
insert into student values(2,'howie',80);
//也可以这样添加数据
insert into student set id=3,name="howie",grade=90;
//同时添加多条数据
insert into student values
(4,'howie',80),
(5,'howie',80),
(6,'howie',80);

1-6.更新数据

1
2
3
4
//更新id=1的数据
update student set name="howie1",grade=60 where id=1;
//批量更新,如果没有where子句,会更新表中所有对应数据
update student set grade=100 where id<4;

1-7.删除数据

1
2
3
4
5
6
//删除id=6的数据
delete from student where id=6;
//批量删除数据
delete from student where id>3;
//删除所有数据,DDL(数据定义语言)语句 truncate table student也可以删除表内所有数据
delete from student;

二 、单表查询和多表操作

单表查询:如何从数据库中获取你需要的数据 多表查询:实际开发中,需要进行2张表以上进行操作

2-1-1.单表查询

 1
 2
 3
 4
 5
 6
 7
 8
 9
10
11
12
13
14
15
16
17
18
19
20
21
22
23
24
25
26
27
28
29
30
31
32
33
34
//建立表student
create table student(
  id int not null auto_increment,
  name varchar(20) not null,
  grade float,
  primary key(id)
);
//插入数据
insert into student (name,grade) values
("howie1",40),
("howie1",50),
("howie2",50),
("howie3",60),
("howie4",70),
("howie5",80),
("howie6",null);
//查询全部
select * from student;
//查询某个字段
select name from student;
//条件查询,查询id=2学生的信息
select * from student where id=2;
//in关键字查询,也可以使用not in
select * from student where id IN(1,2,3);
//between and关键字查询
select * from student where id between 2 and 5;
//空值(NULL)查询,使用IS NULL来判断
select * from student where grade is null;
//distinct关键字查询
select distinct name from student;
//like关键字查询,查询以h开头,e结尾的数据
select * from student where name like "h%e";
//and关键字多条件查询,or关键字的使用也是类似
select * from student where id>5 and grade>60;

2-1-2.高级查询

 1
 2
 3
 4
 5
 6
 7
 8
 9
10
11
12
13
14
15
16
17
18
19
20
21
22
23
24
25
26
//聚合函数
//count()函数,sum()函数,avg()函数,max()函数,min()函数
select count(*) from student;
select sum(grade) from student;
select avg(grade) from student;
select max(grade) from student;
select min(grade) from student;
//对查询结果进行排序
select * from student order by grade;
//分组查询
//1.单独使用group by分组
select * from student group by grade;
//2.和聚合函数一起使用
select count(*),grade from student group by grade;
//3.having关键字一起使用
select sum(grade),name from student group by grade having sum(grade) >100;
//使用limit限制查询结果的数量
select * from student limit 5;
select * from student limit 2,2;
select * from student order by grade desc limit 2,2;
//函数,mysql提供了许多函数
select concat(id,':',name,':',grade) from student;
//为表取别名
select * from student as stu where stu.name="howie";
//为字段取别名,as关键字也可以不写
select name as stu_name,grade stu_grade from student;

2-2.多表操作

介绍知识点如下:

  • 1.了解外键
  • 2.了解关联关系
  • 3.了解各种连接查询多表的数据
  • 4.了解子查询,会使用各种关键字以及比较运算符查询多表中的数据

2-2-1.外键

外键是指引用另一个表中的一列或者多列,被引用的列应该具有主键约束或者唯一性约束,用于建立和加强两个数据表之间的连接。

 1
 2
 3
 4
 5
 6
 7
 8
 9
10
11
12
13
14
//创建表class,student
create table class(
   id int not null primary key,
   classname varchar(20) not null
)ENGINE=InnoDB;
create table student(
   stu_id int not null primary key,
   stu_name varchar(20) not null,
   cid int not null      -- 表示班级id,它就是class表的外键
)ENGINE=InnoDB;
//添加外键约束
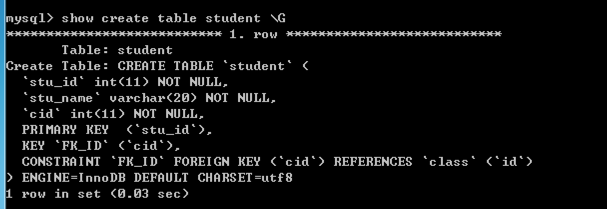
alter table student add constraint FK_ID foreign key(cid) references class(id);
//删除外键约束
alter table student drop foreign key FK_ID;

看下图可知外键添加成功:

img

2-2-2.操作关联表

 1
 2
 3
 4
 5
 6
 7
 8
 9
10
11
12
13
14
15
16
17
18
19
20
21
22
23
24
25
26
27
28
//数据表有三种关联关系,多对一、多对多、一对一
//学生(student)和班级(class)是多对一关系,添加数据
//首选添加外键约束
alter table student add constraint FK_ID foreign key(cid) references class(id);
//添加数据,这两个表便有了关联若插入中文在终端显示空白,可设置set names 'gbk';
insert into class values(1,"软件一班"),(2,"软件二班");
insert into student values(1,"howie",1),(2,"howie1",2),(3,"howie2",1),(4,"howie3",2);
//交叉连接
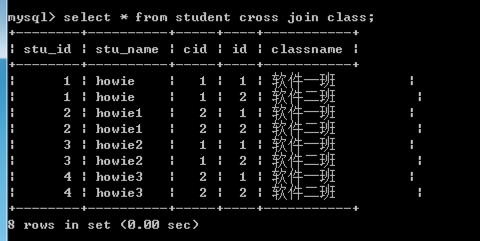
select * from student cross join class;
//内连接,该功能也可以使用where语句实现
select student.stu_name,class.classname from student join class on class.id=student.cid;
//外连接
//首先在student,class表中插入数据
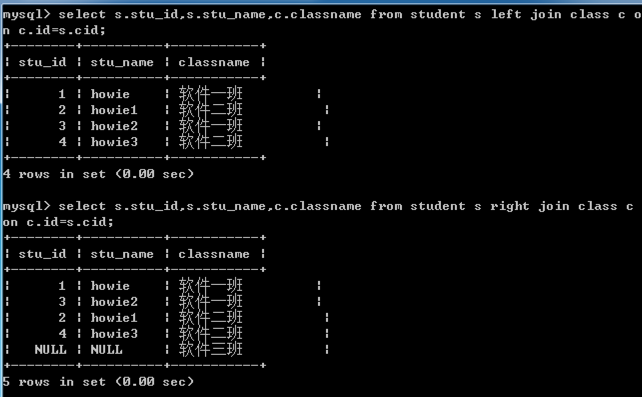
insert into class values(3,"软件三班");
//左连接,右连接
select s.stu_id,s.stu_name,c.classname from student s left join class c on c.id=s.cid;
select s.stu_id,s.stu_name,c.classname from student s right join class c on c.id=s.cid;
//复合条件连接查询就是添加过滤条件
//子查询
//in关键字子查询跟上面的in关键字查询类似
select * from student where cid in(select id from class where id=2);
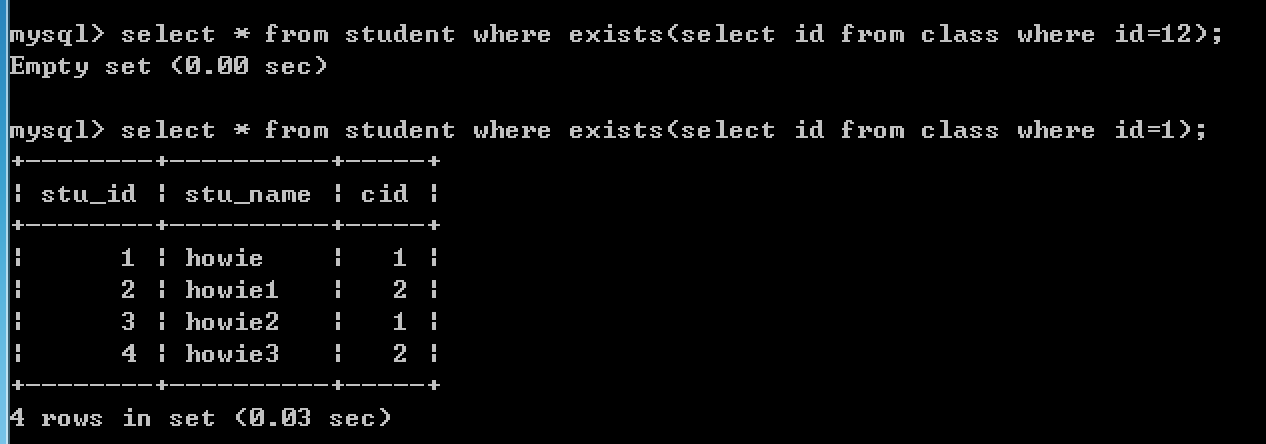
//exists关键字查询,相当于测试,不产生数据,只返回true或者false,只有返回true,外层才会执行,具体看下图
select * from student where exists(select id from class where id=12);   -- 外层不会执行
select * from student where exists(select id from class where id=1);    -- 外层会执行
//any关键字查询
 select * from student where cid>any(select id from class);
//all关键字查询
 select * from student where cid=any(select id from class);

具体结果请看下图:

img

img

img

img

img

img

三 、事务与存储过程

事务的概念,会开启、提交和回滚事务 事务的四种隔离级别 创建存储过程 调用、查看、修改和删除存储过程

3-1 事务管理

 1
 2
 3
 4
 5
 6
 7
 8
 9
10
11
12
13
14
15
16
17
18
19
20
21
22
23
24
25
26
27
28
29
30
31
32
33
34
start transaction;  -- 开启事务
commit;             -- 提交事务
rollback;           -- 取消事务(回滚)
//创建表account,插入数据
create table account(
  id int primary key auto_increment,
  name varchar(40),
  money float
);
insert into account(name,money) values('a',1000),('b',2000),('c',3000);
//利用事务实现转账功能,首先开启事务,然后执行语句,提交事务
start transaction;
update account set money=money-100 where name='a';
update account set money=money+100 where name='b';
commit;
//事务的提交,通过这个命令查看mysql提交方式
select @@autocommit; -- 若为1,表示自动提交,为0,就要手动提交
//若事务的提交方式为手动提交
set @@autocommit = 0; -- 设置为手动提交
start transaction;
update account set money=money+100 where name='a';
update account set money=money-100 where name='b';
//现在执行select * from account 可以看到转账成功,若此时退出数据库重新登录,会看到各账户余额没有改变,所以一定要用commit语句提交事务,否则会失败
//事务的回滚,别忘记设置为手动提交的模式
start transaction;
update account set money=money-100 where name='a';
update account set money=money+100 where name='b';
//若此时a不想转账给b,可以使用事务的回滚
rollback;
//事务的隔离级别
read uncommitted;
read committed;
repeatable read;
serializable;

3-2 存储过程

 1
 2
 3
 4
 5
 6
 7
 8
 9
10
11
12
13
14
15
16
17
18
19
20
21
22
23
24
25
26
27
//创建查看student表的存储过程
//创建student
create table student( 
  id int not null primary key auto_increment, 
  name varchar(4), 
  grade float 
)ENGINE=InnoDB default character set utf8;
delimiter //  -- 将mysql的结束符设置为//
create procedure Proc()
  begin
  select * from student;
  end //
delimiter ;   -- 将mysql的结束符设置为;
call Proc();  -- 这样就可以调用该存储过程
//变量的使用,mysql中变量不用事前申明,在用的时候直接用“@变量名”使用就可以
set @number=100; -- 或set @num:=1;
//定义条件和处理程序
//光标的使用
//1.声明光标
DECLARE * cursor_name* CURSOR FOR select_statement
2. 光标OPEN语句
OPEN cursor_name
3. 光标FETCH语句
FETCH cursor_name INTO var_name [, var_name] ...
4. 光标CLOSE语句
CLOSE cursor_name
//流程控制的使用  不做介绍

3-3 调用存储过程

 1
 2
 3
 4
 5
 6
 7
 8
 9
10
11
//定义存储过程
delimiter //
create procedure proc1(in name varchar(4),out num int)
begin
select count(*) into num from student where name=name;
end//
delimiter ;
//调用存储过程
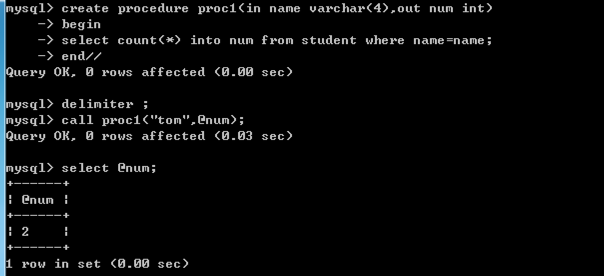
call proc1("tom",@num) -- 查找名为tom学生人数
//查看结果
select @num;  -- 看下图

img

1
2
3
4
5
6
//查看存储过程
 show procedure status like 'p%' \G -- 获得以p开头的存储过程信息
//修改存储过程
alter {procedure|function} sp_name[characteristic...]
//删除存储过程
drop procedure proc1;

四、视图

如何创建视图 查看、修改、更新、删除视图

4-1、视图的基本操作

 1
 2
 3
 4
 5
 6
 7
 8
 9
10
11
12
13
14
15
//在单表上创建视图,重新创建student表,插入数据
create table student(
  id int not null primary key auto_increment,
  name varchar(10) not null,
  math float,
  chinese float
);
insert into student(name,math,chinese) values
('howie1',66,77),
('howie2',66,77),
('howie3',66,77);
//开始创建视图
create view stu_view as select math,chinese,math+chinese from student;  -- 下图可看出创建成功
//也可以创建自定义字段名称的视图
create view stu_view2(math,chin,sum) as select math,chinese,math+chinese from student;

img img

 1
 2
 3
 4
 5
 6
 7
 8
 9
10
11
12
13
14
15
16
17
18
19
20
21
22
23
24
25
26
27
//在多表上创建视图,创建表stu_info,插入数据
create table stu_info(
  id int not null primary key auto_increment,
  class varchar(10) not null,
  addr varchar(100)
);
insert into stu_info(class,addr) values
('1','anhui'),
('2','fujian'),
('3','guangdong');
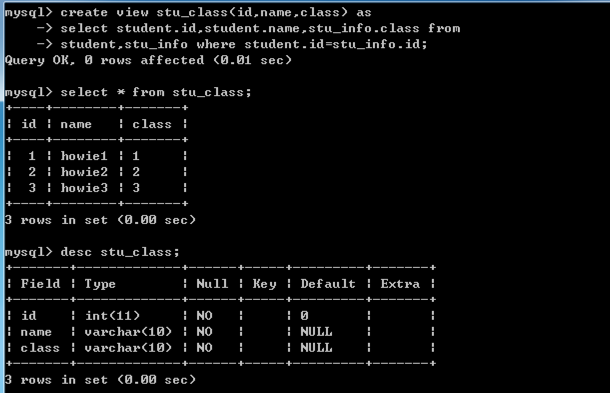
//创建视图stu_class
create view stu_class(id,name,class) as 
select student.id,student.name,stu_info.class from 
student,stu_info where student.id=stu_info.id;
//查看视图
desc stu_class;
show table status like 'stu_class'\G
show create view stu_class\G
//修改视图
create or replace view stu_view as select * from student;
alter view stu_view as select chinese from student;
//更新视图
update stu_view set chinese=100;
insert into student values(null,'haha',100,100);
delete from stu_view2 where math=100;
//删除视图
drop view if exists stu_view2;

img

五、总结

笔记参考《MySql数据库入门》 基本命令就这么多,仍需多多敲写巩固 以上命令本人全部敲过,若有错误,敬请指出,希望有帮助,谢谢。